I enjoyed reading this recent post by Pernille Ripp called There is not just one right way to be a connected educator , from her blog Blogging Through the Fourth Dimension. Too many teachers are still in silos and are likely too isolated. Many excellent ideas in the post, and Ms. Ripp makes several thoughtful points about what it means to be a "connected educator." One is that there are certainly many choices to get connected with other educators (don't forget face to face!), but at the end of the day, just stay connected.
Please take a look. What are your thoughts about being a "connected educator"?
Thanks to Pernille Ripp for letting me share this!
Thursday, April 30, 2015
Thursday, April 23, 2015
Student Tested Presentation Tools - Updated
Time to update this post from 2013 with some great new tools!
Slideshows are an easy way for students to share what they’ve learned. Whether they are illustrating the theme of a novel, comparing characters, or sharing metaphors from poetry, slideshows allow students to tap into their creativity and allow for a wider audience.
Slideshows are an easy way for students to share what they’ve learned. Whether they are illustrating the theme of a novel, comparing characters, or sharing metaphors from poetry, slideshows allow students to tap into their creativity and allow for a wider audience.
 As with all presentations, slideshows should support a story that is being told. Students should know whether the slideshow is meant to enhance their presentation, or be the presentation (provide information). Either way they should adhere to some basic rules - make sure the images are appropriate, engages the viewer, and supports the content. Text should be kept to a minimum and easy to read. Don’t allow students to read from the slides (indicates too much text).
Many of the web-based applications have simplified the process by making copyright friendly images and music available to use. Some slideshows allow for recorded narration, others allow text. Many have built-in backgrounds and transitions. Best news – all the ones below are free; and are available online or iOS! Here are some our students (and I) have used and enjoy:
Animoto: Upload your photos and videos; then add their background and music. Very easy to use. Free version is limited, the $30/year plan is worth it.
Canva: This graphic design tool can make student presentations look truly professional. Templates are available to get them started, or go with a blank canvas. There are plenty of backgrounds, images, icons and text options to use, or upload your own images. Work can be saved online, or shared as a PDF or JPEG. The Design School offers tutorials in design and creation.
Canva: This graphic design tool can make student presentations look truly professional. Templates are available to get them started, or go with a blank canvas. There are plenty of backgrounds, images, icons and text options to use, or upload your own images. Work can be saved online, or shared as a PDF or JPEG. The Design School offers tutorials in design and creation.
VoiceThread: Students can add their images and record their voices to tell their story. The audience can add comments too. See our previous post.
Prezi: Students love Prezi. Can add images, video, text, shapes and the zoom feature allows students to focus on what’s important.
Looking for other tools for the classroom? We have updated the Tools/Resources page. If you have favorites we left out, please let us know!
Looking for other tools for the classroom? We have updated the Tools/Resources page. If you have favorites we left out, please let us know!
Monday, April 20, 2015
iOS Accessibility Options
I just put this together for a class I'm taking, and thought it might be useful to post on this blog as well.
The iPad and other iOS devices offers a number of accessibility features to assist users. Many of these features can be found in Settings --> General --> Accessibility. There are four sections, each with a few features allowing users to pick and choose what is necessary to make their experience more user-friendly.
Vision features assist the visually impaired or blind student. Some of the settings allow the user to manipulate the size of text and icons. There is a voice-over feature, using Siri to verbalize screen touches, as well as using a finger to draw letters instead of typing. Speech reads the content on the screen, making email, text messages, web pages and books accessible.
iPads also allow for a braille display when connected to a wireless braille device. These displays allow for braille in a number of languages.
Communication and collaboration between visually and hearing impaired students can take place using Facetime, the iOS video calling feature. Students who use sign language can see each other, including gestures and facial expressions, making Facetime a valuable tool.
Hearing impaired students have a number of options on an iOS device. They can turn on Closed Captioning to view CC enabled videos and podcasts, including ones in iTunes U. There is mono audio available for students who hear best from one ear. And iOS offers connectivity for Bluetooth-enabled hearing aids.
Students with physical or motor challenges have some options on the iPad. AssistiveTouch allows users who can’t pinch or spread fingers to use a one-touch or assistive device to substitute for the more complication gestures.
Students can use Siri to provide certain directions to the device, such as sending a message or scheduling a task. Many apps that require typing now has the Dictation feature, where students can talk instead of type. There is also Switch Control that allows Bluetooth-enabled hardware to perform certain on-screen tasks.
Students with speech impairments can use Facetime to communicate using sign language. iMessage allows them to collaborate using text. Speech Selection allows the device to speak for you. This feature can also help students with speech development, providing an always-accessible model.
From the list of accessibility features listed above, it appears that Apple is making a thoughtful effort to assist disabled users. From my observation, just in the past couple years this list has grown, especially with accessibility to Bluetooth-enabled assistive tools. In addition, Apple has partnered with third-party app developers to provide learning tools to students and others who need them.
Here are some links to additional iOS accessibility details:
https://www.apple.com/accessibility/
https://www.apple.com/ios/accessibility-tips/
https://www.imore.com/how-use-accessibility-iphone-and-ipad-ultimate-guide
The iPad and other iOS devices offers a number of accessibility features to assist users. Many of these features can be found in Settings --> General --> Accessibility. There are four sections, each with a few features allowing users to pick and choose what is necessary to make their experience more user-friendly.
| iPad Settings |
Vision features assist the visually impaired or blind student. Some of the settings allow the user to manipulate the size of text and icons. There is a voice-over feature, using Siri to verbalize screen touches, as well as using a finger to draw letters instead of typing. Speech reads the content on the screen, making email, text messages, web pages and books accessible.
iPads also allow for a braille display when connected to a wireless braille device. These displays allow for braille in a number of languages.
Communication and collaboration between visually and hearing impaired students can take place using Facetime, the iOS video calling feature. Students who use sign language can see each other, including gestures and facial expressions, making Facetime a valuable tool.
Hearing impaired students have a number of options on an iOS device. They can turn on Closed Captioning to view CC enabled videos and podcasts, including ones in iTunes U. There is mono audio available for students who hear best from one ear. And iOS offers connectivity for Bluetooth-enabled hearing aids.
Students with physical or motor challenges have some options on the iPad. AssistiveTouch allows users who can’t pinch or spread fingers to use a one-touch or assistive device to substitute for the more complication gestures.
Students can use Siri to provide certain directions to the device, such as sending a message or scheduling a task. Many apps that require typing now has the Dictation feature, where students can talk instead of type. There is also Switch Control that allows Bluetooth-enabled hardware to perform certain on-screen tasks.
Students with speech impairments can use Facetime to communicate using sign language. iMessage allows them to collaborate using text. Speech Selection allows the device to speak for you. This feature can also help students with speech development, providing an always-accessible model.
From the list of accessibility features listed above, it appears that Apple is making a thoughtful effort to assist disabled users. From my observation, just in the past couple years this list has grown, especially with accessibility to Bluetooth-enabled assistive tools. In addition, Apple has partnered with third-party app developers to provide learning tools to students and others who need them.
Here are some links to additional iOS accessibility details:
https://www.apple.com/accessibility/
https://www.apple.com/ios/accessibility-tips/
https://www.imore.com/how-use-accessibility-iphone-and-ipad-ultimate-guide
What resources do you find helpful? Any capabilities you particularly like?
Thursday, April 9, 2015
Roses are Red, Laptops are Blue...
 |
| Poetry, Teresa Grau Ros, Flickr |
April is Poetry Month, an annual reminder of the need to expose students to poetry as a form of literature. No longer is teaching specific types of poetry found in the standards, but reading with comprehension is (grades 1 and up). In fact, for each grade level numerous classic poems are included in Appendix B of the CCSS.
Poetry is also a genre students can use to express their thoughts, compare themes, understand figurative language, etc., as part of the writing process. Teaching students how to write a haiku for a science lesson on weather, for example, is a fun way to blend science with ELA. An ode to geometric shapes gives students the opportunity to show what they know about polygons in a lyrical way.
Poetry becomes more meaningful when it has a visual element. Meaning comes to life and gives substance to the creator’s intent. Using technology can add both a creative and the collaborative dimension to the writing process.
A favorite illustration of the use of poetry, science and technology is this VoiceThread created by Mrs. Mattson’s 3rd grade class a couple years ago. Not only did the students have an opportunity to write and draw, but also reflect on their learning, and share their work with a more global audience. The students received supportive feedback from not only their teacher, but classmates, friends and family too.
Here are some other ideas on how to integrate technology with poetry:
- Illustrate poems with Haiku Deck, Adobe Voice or Tellagami
- Make “comic strips” using Google Slides
- Put together books of poems with Book Creator, Shutterfly Photo Story or Storybird
- Video student recitations and post to class Twitter account or blog
Share your ideas, we always want to know!
Thursday, April 2, 2015
iPads, Photos and the Art of Content Creation
One of the most valuable apps on your iPad is ... Photos. Yes, that innocuous button that resembles the NBC peacock holds the key to effective content creation, and ultimately higher levels of student learning. To get the most out of the iPad as a content creation tool, students need to understand a few important features of Photos, the iPad camera, and photo curation.
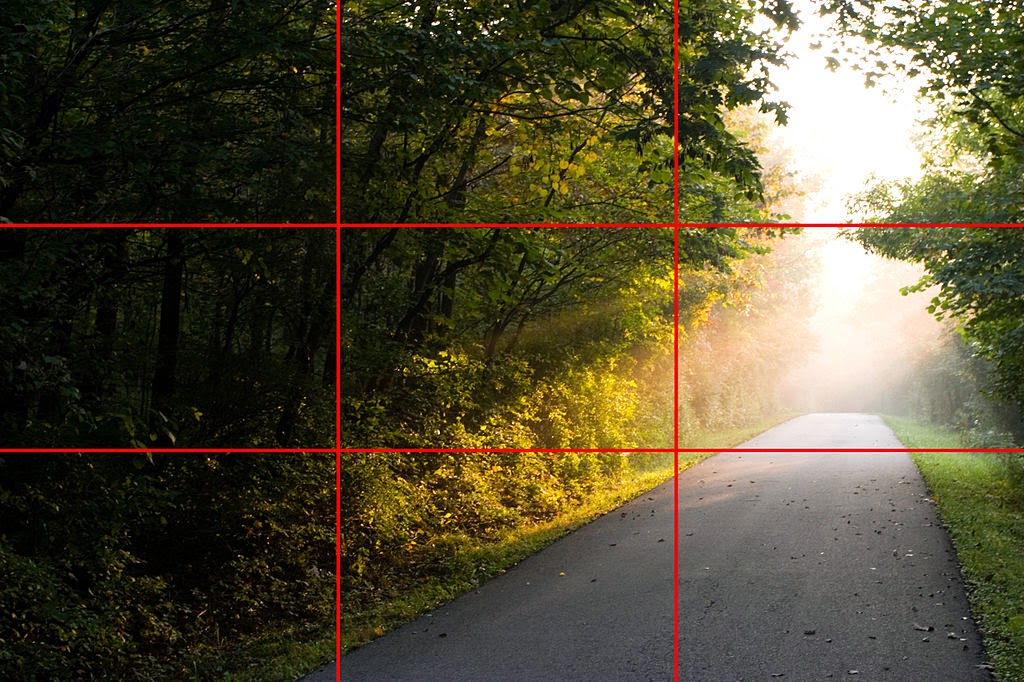
First, teach your students how to take a quality photo with their iPad. Some camera features students should know include tap to focus and pinch to zoom. These features allow students to get the clearest photo with little effort. The should also learn how to use the grid (turn on in Settings) so they can practice The Rule of Thirds. As you see in this photo, the subject is not centered, but in the right third, making the photo more interesting.
Next, show students how to find photo albums on their iPad. Here is where they locate their photos, as well as content created on third party apps like Tellagami, Skitch and Shadow Puppet EDU. In Moments, you will see Albums at the bottom of the screen.

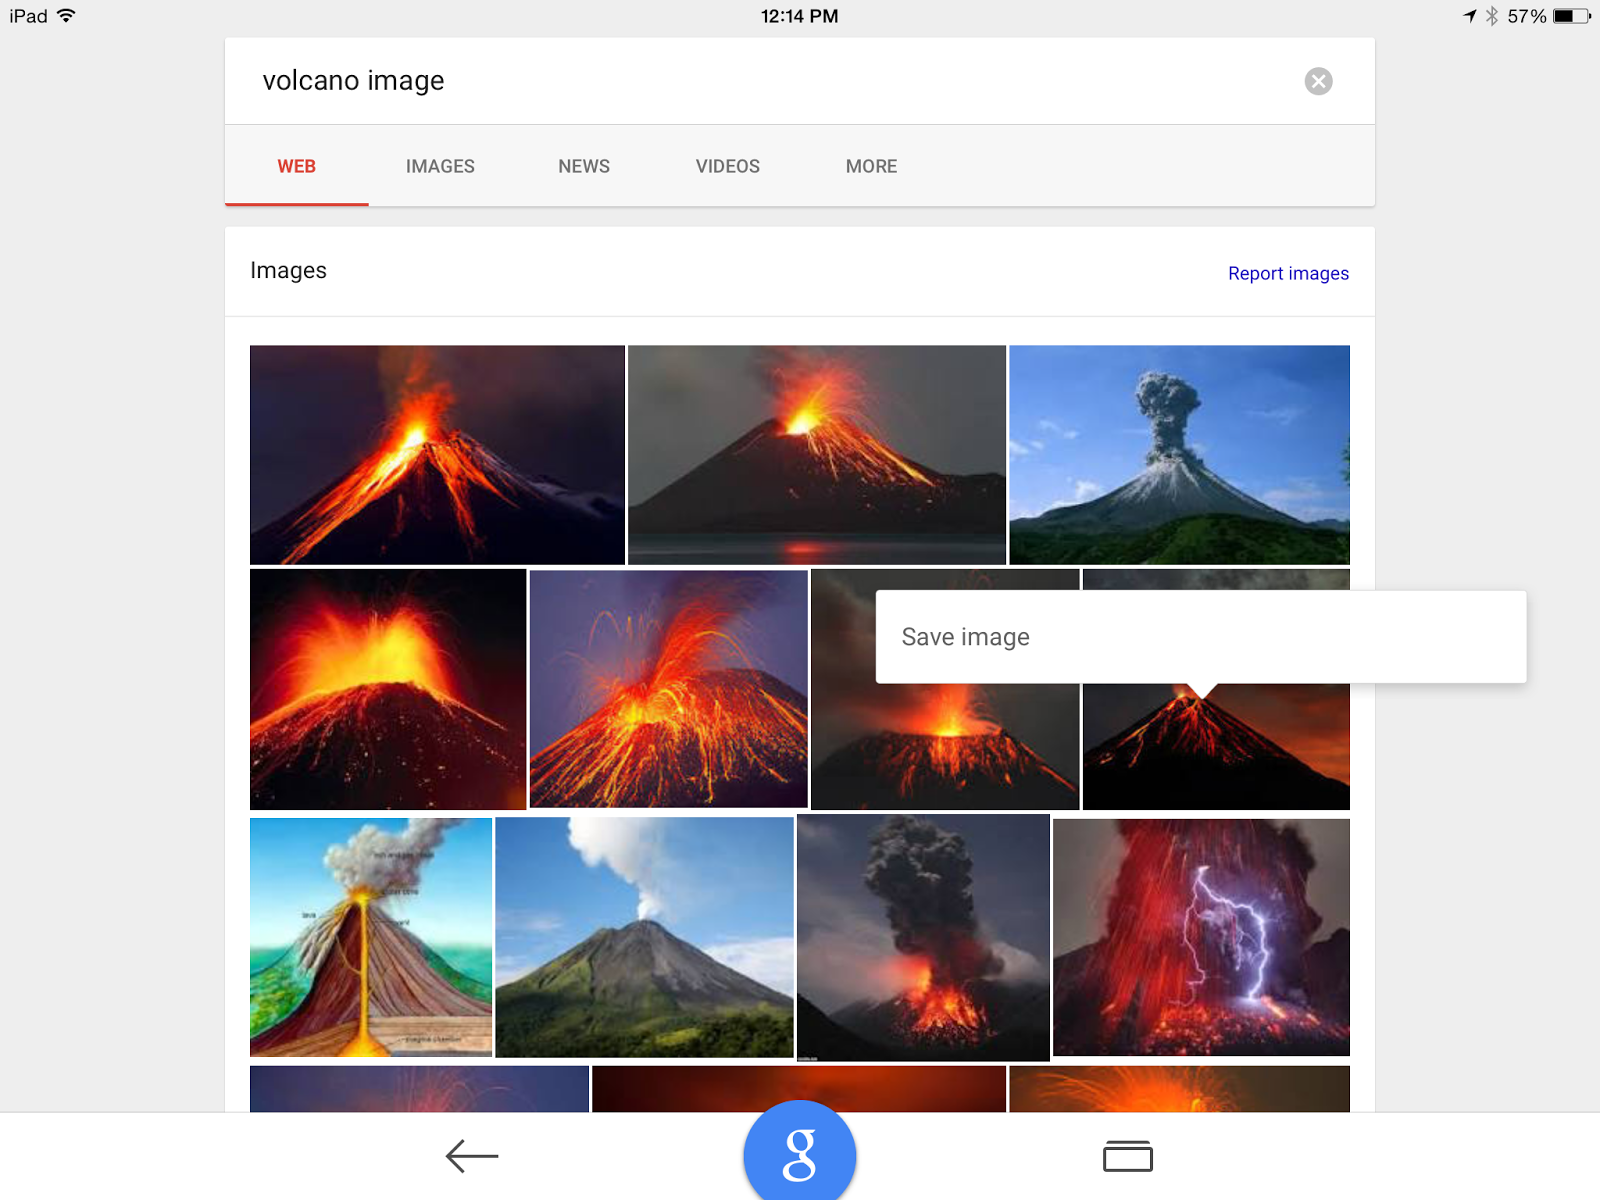
More and more, applications like those noted above save the content to Photos. This is an important feature to look for when shopping for apps, as it makes access to content so much easier. Many apps now upload from Photos too, so pulling in saved photos is a snap. Using Google to find an image? Simply search in Google and find the image you want. Hold down on the image until you see Save Image pop up. Tap on it, and off it goes to your Photos. Then students can upload the photo to projects created in other applications (in a copyright-friendly manner!).
Better yet, take your students outside and have them take pictures. It's a great way to see and capture math and science in the real world. And who knows, some may develop a life-long love of photography from the experience. Then teach them how to protect their own work with a Creative Commons license!
Have classroom photo tips to share? Please comment and let us know!
Wednesday, April 1, 2015
Subscribe to: Posts (Atom)